Whimsy ~ Witches Hat Tutorial
Hey crafty friends, as promised, I'm back with a tutorial for the lil' witches hat I created for my Halloween Wall Hanging. If you missed that post, then click on this link to head there. That post was so lengthy as it was, I decided to share the tutorial separately. It's not difficult, in fact it's really easy, it's just fiddly and may take some photo explanation! So let's get going.

Blown up in this pic, you'd be forgiven for thinking this was large enough to wear, but in fact this lil' witches hat sits perfectly in my hand and made the sweetest finish to two of the strands from my Halloween Wall Hanging. Creating this wee hat was super easy, thanks to the Whimsy Stamps Pierced and Stitched Circles Die Set.

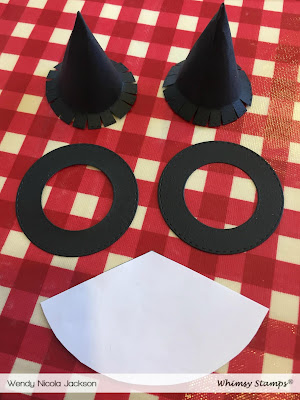
Above shows the two diecut rings using those small dies from the Whimsy Stamps Pierced and Stitched Circles Die Set. The hat brim has a lovely stitched finish from the die, which looks really lovely close up. Now we need to trim down the largest circle just over 1/3 of the circle. You can easily cut two hat tips from one circle, leaving a little less than 1/3 remaining. I didn't measure this exactly, but if anyone would like a template of this bit, I'm sure I can take a photo for sizing up. It's best to cut a little more than you need, rather than not enough, as you can just curl it around a little tighter to make it fit. So cut a paper copy first as I did here and have a play with the size and how well it fits inside the brim once overlapped a little. When I added the adhesive, I made sure that it was spread wider at the base and disappeared to a thin line towards the peak of the hat. I used a strong double sided sticky tape to adhere mine. I tried along the edge where it disappeared to a fine line and that bit I trimmed away, was perfect for adhering the second hat. Once the semicircle was adhered around to create the hat tip, I used scissors to cut little lines a few millimetres into the base of the hat all the way around facing up from the base towards the tip. These little cuts are then folded back around the hat to create the tabs that fit between the top and bottom brim to hold the two sections of the hat together. I used a strong glue. Olba or Pinflair as it's known in the UK is perfect for this part of the creating process. I held and worked the two brims together for several minutes while the glue was fusing together to be sure there was good adherence.


I cut into the ring and then measured around the hat to know where to trim it. I made sure it overlapped slightly so it had a nice finish and no gap. I used a thicker cardstock for this, but in retrospect, I'd recommend using a thinner cardstock, so it doesn't resist staying in place quite as much as mine did. The strong glue finally took, but I did have to hold it in place for quite some time to stop the ends from springing open and unfurling from the hat. I'm trying to hunt down a die I have that has a little buckle on it, as I think this would be such a lovely finish, but I'll have to update this when I find it. For now, it's just the orange trim in place. So there you have it. One teeny but perfect witches hat, made entirely from one fabulous die set. If you'd like to see it hanging as part of the Halloween Wall Hanging I created, just click here to head to that post.


The first thing I did was diecut the largest circle from the Whimsy Stamps Pierced and Stitched Circles Die Set from black cardstock. You could make your witches hat any colour you like, but I made mine the traditional black. After diecutting that largest circle, I set the circle aside and diecut the smallest circle from the set surrounded by third smallest from the set. Leaving one die between the two I used still in the packet. I cut four of these as I was making two witches hats and you need two per hat. One for the top of the hat and one to go beneath the tabs which you cut from the main circle. See below to understand that process.

Above shows the two diecut rings using those small dies from the Whimsy Stamps Pierced and Stitched Circles Die Set. The hat brim has a lovely stitched finish from the die, which looks really lovely close up. Now we need to trim down the largest circle just over 1/3 of the circle. You can easily cut two hat tips from one circle, leaving a little less than 1/3 remaining. I didn't measure this exactly, but if anyone would like a template of this bit, I'm sure I can take a photo for sizing up. It's best to cut a little more than you need, rather than not enough, as you can just curl it around a little tighter to make it fit. So cut a paper copy first as I did here and have a play with the size and how well it fits inside the brim once overlapped a little. When I added the adhesive, I made sure that it was spread wider at the base and disappeared to a thin line towards the peak of the hat. I used a strong double sided sticky tape to adhere mine. I tried along the edge where it disappeared to a fine line and that bit I trimmed away, was perfect for adhering the second hat. Once the semicircle was adhered around to create the hat tip, I used scissors to cut little lines a few millimetres into the base of the hat all the way around facing up from the base towards the tip. These little cuts are then folded back around the hat to create the tabs that fit between the top and bottom brim to hold the two sections of the hat together. I used a strong glue. Olba or Pinflair as it's known in the UK is perfect for this part of the creating process. I held and worked the two brims together for several minutes while the glue was fusing together to be sure there was good adherence.

Next I wanted to embellish the hat with a little trim and if you've ever tried to tie a ribbon around one of these, you'll now it just doesn't work, because the ribbon is straight not curved as the hat is. So the best trick for trimming these wee hats, is to cut some coloured cardstock from the same large die as the original circle (the largest from the Whimsy Stamps Pierced and Stitched Circles Die Set. To get that lovely thin trim, I lined up the die that was the next size down from the largest inside that largest one and diecut them together. This left a nice large circle and that little thin ring. I've already cut into the one above, but you can image the entire ring around that large circle.

I cut into the ring and then measured around the hat to know where to trim it. I made sure it overlapped slightly so it had a nice finish and no gap. I used a thicker cardstock for this, but in retrospect, I'd recommend using a thinner cardstock, so it doesn't resist staying in place quite as much as mine did. The strong glue finally took, but I did have to hold it in place for quite some time to stop the ends from springing open and unfurling from the hat. I'm trying to hunt down a die I have that has a little buckle on it, as I think this would be such a lovely finish, but I'll have to update this when I find it. For now, it's just the orange trim in place. So there you have it. One teeny but perfect witches hat, made entirely from one fabulous die set. If you'd like to see it hanging as part of the Halloween Wall Hanging I created, just click here to head to that post.
I hope you enjoyed this tutorial. I hadn't intended to do a tutorial, so didn't take quite as many pics along the process as I could have. I'll try to remember to in future! If you give it a go, let me know how you get on! Remember to check out our Mini-Release at Whimsy Stamps. There's been some gorgeous pre-release goodies pop up in a special Mini-Release at Whimsy this weekend, in celebration of the Whimsy Retreat, that's been running over the weekend. Click through on the banner above it you'd like to check this out. I'll be back again very soon with another crafty adventure, until then, I wish you a wonderful week. Hugs and happy crafting xoxo


Challenge Entries:


Comments
xxx