Whimsy Stamps & Pear Blossom Press Collaboration Hop
Hey crafty friends, we have a fun event kicking off today. Whimsy Stamps and Pear Blossom Press have come together for some illuminating fun! We're bringing these two fabulous craft brands together and seeing what magic can be made! I wasn't sure the light kit would make it to me in New Zealand as the batteries which are part of the pack, can't be imported here. But my clever boss pulled them out and sent the rest! So I got to play with the lights too! Very easy to find a little button battery here, so was easy to get the kit going and I have to say, their light kits are so easy to use! It was a joy.
I made a card I'm going to tuck away for my brother's 50th Birthday later in the year. I used lots of gorgeous rainbow hues and I used the cute rainbow candle, I even made the cake a rainbow cake. I even gave the sentiment an ombré rainbow treatment. In this first photo, you can see the lights shining in natural light. I'll show a pic in lower light a bit later.
The pic above shows the card without the lights glowing, which still looks fun right?! I've used some fabulous Whimsy Stamps Clear Stamp Sets to create this fun montage of celebratory panels. I included a cute star burst from the set that Pear Blossom Press sent us with the lights and if you look closely, you can see the 'press here' beneath the Y on Birthday in that middle panel. This is where I but the light switch. A gentle press here, makes all three lights come to life!
Before deciding the track for the lights and where they would be adhered, I traced the inside of the slimline photo strip die from Whimsy, to know exactly where the inserts would sit. I mapped where the holes would need to be in my designs and then pierced holes in all three panels where the lights would need to shine through. I then flipped them over and started laying down the light tracks making sure I had enough slack on the wires to bridge those gaps in the slimline design. Once I'd taped them all in place, I added the foam tape to elevate these panels to allow for the switch mechanism. I pulled off the backing from the foam strips and then added some waste paper from some used foam sheets I'd kept for just this sort of task, which allowed me to adhere one panel at a time without the other two adhering prematurely. This gave me time to line them all up properly, one by one.
Here they are all lit up in the evening low light. The lights glow really nicely and look great day or night. I diecut the Slimline Film Strip Die from a really pretty pewter coloured shiny cardstock which gives this card a really fun retro film finish.
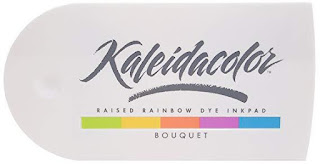
For this central ombré inked sentiment panel. I first stamped the sentiment which I used a cool multi colour ink pad from Tsukineko's Kaleidacolor Range. This one is the Bouquet combination of ink. I used my MISTI to do the stamping a couple of times to get good coverage. I worked out where I wanted to add the little flame for the candle, which this sentiment from Whimsy had a perfect spot for! I used one of the cute little candles which I cut down slightly to work for the dimensions of this design and kept the off-cut. I glued it in place with liquid glue and added the flame above, over the hole I had previously made with a pokey tool. Once they were glued in place, I added some black streamers. I didn't want to detract from the ombré sentiment in this frame, so opted for black and then added a few starbursts in a deep purple.
I chose a cute little cake from a sweet Whimsy set which has party monsters. I coloured it in rainbow colours and then took that off-cut from the first candle, as I realised it was pretty much perfect for this shorter wee candle and glued it over the one in the stamp and added the flame over the hole I'd made earlier when working out where the lights should be for each frame. I used a larger flame in the first frame I showed. This frame, I used a smaller flame. The bag of flames we were sent is really generous. I'm not sure I'll ever run out! There are oodles. So I'll be pulling those out for other makes soon. I made the streamers in this frame in rainbow shades and added some more of the starbursts from the Pear Blossom Press Stamp Set. This set is a cute little companion set for their lights, which have commands, like Pull, Push, Press Here etc, that you can stamp where the interactive element is. A great little companion set for their lights.
Whimsy has a really fun stamp set which goes with an interactive turning wheel die. I don't have the die yet, but I just love the stamps in this set and decided I could work a few from this set into this celebration card. The numbers and sentiment in this frame are from that set, as are the starburst fans and streamers. Fun for creating a celebratory scene. I wanted to cover the hole I'd made in the largest starburst fan and remembered some little glittery glass embellishments I had in my stash. I don't know if they're actually glass, more likely a resin, but they have a glittery sheen to them, it's lovely. They're from a New Zealand company called Rosie's Studio. Once I'd put the larger white gem in place, the little starbursts were begging to have their bling too! So I added a little gem on each centre and love how it looks. I coloured the numbers in with a yellow Glitter Brush Marker from Scrapbook.com. It shimmers when it catches the light and is really pretty. I used the same marker to colour the 'make a wish' in the frame with the cake. Keeping the hues consistent across the 3 panels helped keep the look cohesive.
Because I wasn't sure the light units would reach me in New Zealand, I'd bought some other elements that I could get here in New Zealand from Pear Blossom Press. I decided to make a bonus card to showcase one of the extra elements I bought. These are fabulous mini action wobbles. I used one of them behind this adorable turtle above. I've used a divine paper from a newer set from Whimsy called Atlantis. You have to see it to believe it. There are so many beautiful underwater scenes and I combined this fabulous paper with a new bubbly die to create this shaker card. So this is both a shaker and an action wobbler!
I snapped a pic of the elements on my table as I was creating. I had stencilled the little fish in the background at this stage, with some VersaFine Inks and added the sentiment too. I used Twilight for the school of fish on the left and for the sentiment and for the school of fish on the right I used Blue Belle Ink. It was just enough extra detail to se the scene for this cute turtle. I spooned some sequins over the centre of the card before adding the acetate cover panel.
I wanted to bubbles to stand out from the cool die design, so before I added the acetate I traced the inside of the die aperture over some silvery shimmery vellum and then fussy cut the centre out. I then adhered the vellum behind the bubbles and trimmed any of the vellum that snuck out past the border of the aperture. I then adhered the acetate of the vellum, so it gives a lovely shimmer where those bubbles are showcases that lovely die better then just letting the background show through. I achieved the double layer by using a second identical page before the front shaker cover, so the scene matches up beautifully. Once the layers were adhered, it was time to add this cute little turtle. I coloured him in green and brown so he didn't get lost in that sea of blue. I diecut him with matching die for this set. Whimsy does a lot of companion dies now and I must confess, as I'm not a fan of fussy cutting, I tend to go for those for sets that have them. I didn't want the white edge to be too stark against the background, so I grabbed a pale blue glitter brush marker from Scrapbook.com and coloured all the white edges a soft blue. He sits in the scene much nicer for having done this. The little action wobble has to be seen of course, so I will share a reel over on my IG page showing this. He's so very cute. I mounted the finished panels onto a top folding white A2 card base. I'll pair it with a nice bright envelope to post. Probably pink or orange. I think it'll make one of my sweet nieces smile.
The hop will be kicking off on the Pear Blossom Press Instagram Account and finishing on the Whimsy Stamps one. You can click through on the banner above if you'd like to join us and I encourage you to if you're able, as there will be some fun projects, sure to light up your day. Thanks for popping in to visit today and I hope to be back to post another project very soon. Hugs and happy crafting, Wends xoxo
(I share thumbnails to the elements I design with in order to make your search for them easier, in case you like something I've used. I do use affiliate links where possible, which gives me a tiny commission but costs you no extra whatsoever. It helps the companies I design for to improve their marketing practice and track my contributions. I am deeply grateful if you use them for these reasons. I am proud to design for the companies I do and always feel happy to share where my inspiration and where my crafty stash comes from. I am occasionally gifted products to use, but I only design for companies whose products I absolutely love and buy for myself. All opinions expressed in my posts are always my own. If you're new to Whimsy Stamps products, click the highlighted name for a 10% discount off your first order. )
Challenge Entries:


Comments
Blessings
Maxine