Whimsy Stamps ~ Penguin Bubbles
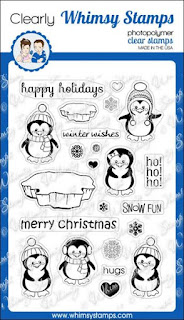
Hey crafty friends, I'm back with another little creation I made today after watching Day 6 of the Online Card Classes Tutorials for the Holiday Card Workshop. Kristina Werner worked her magic again with a wonderful tutorial that I've based this card design on. There was also a tutorial by a crafter called Chari Moss. I've not encountered her before, but her tutorial was wonderful and so easy to follow, so I'll have to give that a go another day. Today, I just so wanted to try the bubbles technique that Kristina taught. It was so much to create! The focus of these tutorials was ways to use 'little' stamps, those tiny extra stamps in sets, that often get overlooked or used only on tags etc. The ideas were wonderful and I was reminded of a fun older Whimsy Stamps set of penguins that I've had in my stash a long while. I've used them before here to create a never ending card, they were a perfect tiny stamp for that creation.
Kristina's card used a handmade stencil which was so innovative, it made me think of the lovely large dots stencil I'd bought recently from Whimsy and decided to use this for my design. I'm so happy with how it came out too! I used Catherine Pooler Inks to do the blending, masking off the open bubbles as I went. I used the colours Bellini, It's A Girl, Sweet Sixteen, Mint To Be and It's A Boy from a minis collection called Spring Fling. The choice of colours for each bubble was pretty random, but happily, I chose to do the three largest ones in the same ink colour, which then became my 'spotlights' for the wee penguins. I kept one of the larger bubbles to the right free to add a sentiment to from the same set as the penguins.
All the tiny stamps are also part of this penguin set and worked so perfectly for this creation. I channelled my inner Kristina for this make and added dash lines around the sides once I'd finished and also on the blue bubbles which I'd chosen to leave without adding any tiny stamps. I coloured the wee penguins with alcohol markers, stamped first in Memento Tuxedo Black ink, as it's Copic friendly. I did some very simple shading on the penguins and added some Stickles in Waterfall to the blue hat and earmuffs and Nuvo Glitter Drops in White Blizzard to the sweet girl penguins hat to finish.
The image above shows my work in progress, before the finishing touches were added and right as I realised I'd put my finger in a still wet inked area and left a big black finger print in the lower right corner! As you can imagine there were a few unhappy words uttered. I let it all dry completely and then took to it with a tombow sand eraser. If you look at the image above again, I can testify that these really do work! I was so relieved when 99% of the black smudge lifted away so well.
I'm so enjoying the Online Card Classes and was so looking forward to the class today. A fun afternoon of ink blending done and I managed to avoid folding 2 baskets of washing, hehe. But that'll still be there tomorrow, right now, I'm off to do a little more ink blending for a class from last week, which I've yet to create from, so watch this space! Thanks for popping in to visit today and for leaving me lovely comments on my previous cards from these classes, I always love knowing what you think! Sending you all a big hug and wishing you happy crafty days xoxo
(I use affiliate links where possible, to allow the companies I design for to track the effectiveness of my contributions. I receive a small commission, which costs you no extra, but helps these companies see where their marketing efforts are most effective. I only design for companies whose products I love and buy for myself. My opinions are always my own. Please feel free to use the Whimsy Stamps $5 discount code in my sidebar if you're doing some shopping.)


Comments
xxx
Pat xx