Spellbinders ~ Helleborus & Letterbox
Hey crafty friends, I'm back with another showcase for Spellbinders. I was sent a very gorgeous letterbox die to use and this reminds me so much of my Grandpa's letterbox. He was a farmer, so of course they had rural post with the little 'pick up' mail flag on it, just as this one does. So I've had such fun creating this rustic themed Christmas card featuring this lovely letterbox die.

I wanted to mirror some of the features of my Grandpa's letterbox, the wooden farm post stand, the rusty finish of the letterbox. His wasn't this rusty, but it definitely had a rustic feel to it! I have some gorgeous papers in my stash from the Cathe Holden Flea Market Finds Collection for Spellbinders. This paper pad is called Neutrals Palette Sampler and it's full of fabulous shabby chic rustic papers. I've used several elements on this card from that paper pad.

The wooden post for the letterbox was cut from a lovely page that has different wood grain textures. The rusty letterbox itself was cut from another page that had this rusty look finish. The hand-written background is another page from the same paper set. Everything I used has had Distress Oxide in Walnut Stain run along the edges and fold lines to bring the dimensional pattern out.

There were two more pages from this paper pad, that I used. The first was for the little letters spilling from the letterbox, this page is actually little postage stamps, but if you don't look too closely, works quite well for letters. I tucked three behind the Helleborus for a bit of interest behind the flower.

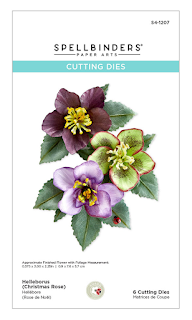
The final page I used was a page with a hessian design on it. I cut the petals for the Helleborus Christmas Rose from the hessian pattern, inking the backs of the petals and the flower edges also with Walnut Stain Distress Oxide. I shaped the petals with a ball tool adhered all the layers, cut leaves and stamen from green foamiran from my stash and finished the flower with a large dark brown flat back pearl. You may recall, I shared a gift box I created with this Helleborus Christmas Rose previously, which if you missed, you can see here.

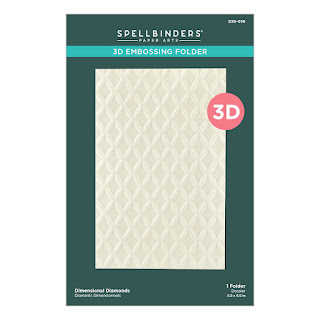
I mounted the design layers onto a brown cardstock which I'd first dry embossed with one of the latest embossing folders released by Spellbinders. This embossing folder is called Dimensional Diamonds 3D. I really like this pattern, it will work for so many different themes and the 3D finish of it is fabulous. I cut this and the hand-written letter layer with Spellbinders A2 Layers Die Set to get the right size for each and ensure straight lines. I love using my little Tim Holtz Guillotine for most of my straight line cuts, but wanted to get the layer sizes just right and this is easiest to do with a set like this. I mounted the whole design onto a kraft card base which I used my little guillotine to cut slightly larger than an A2 card size, so I would have a good border all around the card. I inked the edges of the kraft card base to work with my rustic theme. The embossed layer is popped up on foam for a bit of extra dimension.

To bring balance to the design, I added three little flat back pearls from the same pack as the one I used for the flower. These descend in size. The largest is the next size down from the pearl I used in the flower. I worked with the pattern of the Dimensional Diamonds Embossing Folder to place the pearls in an aesthetically pleasing pattern.

I found this tutorial on putting together the Letterbox Die, created by the designer Susan Tierney-Cockburn, which actually was super helpful, because I'd misinterpreted the tiny die piece as a latch for the side of the letterbox door, when it is actually the pull handle for the front of the letterbox door! So I did a quick change and rearrange after seeing this video, happily before I posted my card, hehe. So it's worth a watch to see her put it all together. (You might notice I reshaped the flower stamen a little too, for a bit more texture and interest.)

Thank you my friends for popping in to visit today. I always love when you pop by. If you let me know you were here, I can return the favour! I hope you've enjoyed this installation of my new adventure with Spellbinders. I still cannot quite believe I was invited to share their products. With all that Yana has going on, I could not believe she would reach out to little old me! So I'm a little in awe and hoping I meet the brief! I'd love to know what you think of my interpretation of these gorgeous dies. Thank you again so much for stopping in. If you don't know who Yana is, I hope you'll take a minute to pop by her blog and read her story. She's is so inspiring.
If you'd like to see the rest of the latest collection from Spellbinders, you can click through on the banner above. I will link thumbnails of all the elements I've used in this creation below. There will be another new collection launched soon and with Halloween and Christmas fast approaching, there are just so many lovely elements being released. So it's worth popping in for a looksy.

For my friends in the UK, did you know that Spellbinders now has a designated UK store? You can click through on the banner above to visit their UK store. The shipping costs are local UK costs, so it makes things a little more accessible.

If you like what you see, be sure to check out the fabulous 'Today's Deals' category on the Spellbinders' site, they've loads of lovely items included in this promotion. I have more than a few items on my wishlist! Thank you again for stopping in to visit today. I really hope you're enjoying my first posts for this new crafty adventure with Spellbinders and I wish you a wonderful day and happy crafting! Big hugs, Wends xoxo


(Affiliate links used where possible, to allow the companies I design for to track the effectiveness of my contributions. I receive a small commission, which costs you no extra, but helps these companies see where their marketing efforts are most effective from their DT and for me helps towards the cost of postage to New Zealand. I only design for companies whose products I love and buy myself. My opinions are always my own. If you're new to Spellbinders, check out the links in my sidebar for some great deals.)


Comments
Blessings
Maxine