Whimsy Stamps ~ Through The Hedgerow Window
Hey crafty friends, I'm back today with a cute Shadow Box card I made with some fun Whimsy elements. I've combined quite a few elements to create this sweet scene. So I'll share some process pics too, as it's hard to appreciate the deeper layers without being able to 'hold it in your hand'.

I've created this cute card for my wee niece who lives in San Diego. She's just the right age to appreciate some fairytale magic in a card. I've used an adorable digital image to create this card from the Some Odd Girl collection at Whimsy. Digital was perfect for this creation, so I could get the size 'just right' to fit and feature through the Hedgerow Window. I have always loved magical doors and windows cut into hedgerows, like they're providing a peek into a secret garden. I am not sure why, but it always reminds me of fairytales, so of course that's where my brain went when I was looking at the brilliant die that I've used to create this design. It's actually from an Easter set, but with a panel inked in shades of green, I think it makes a very nice Hedgerow Window.
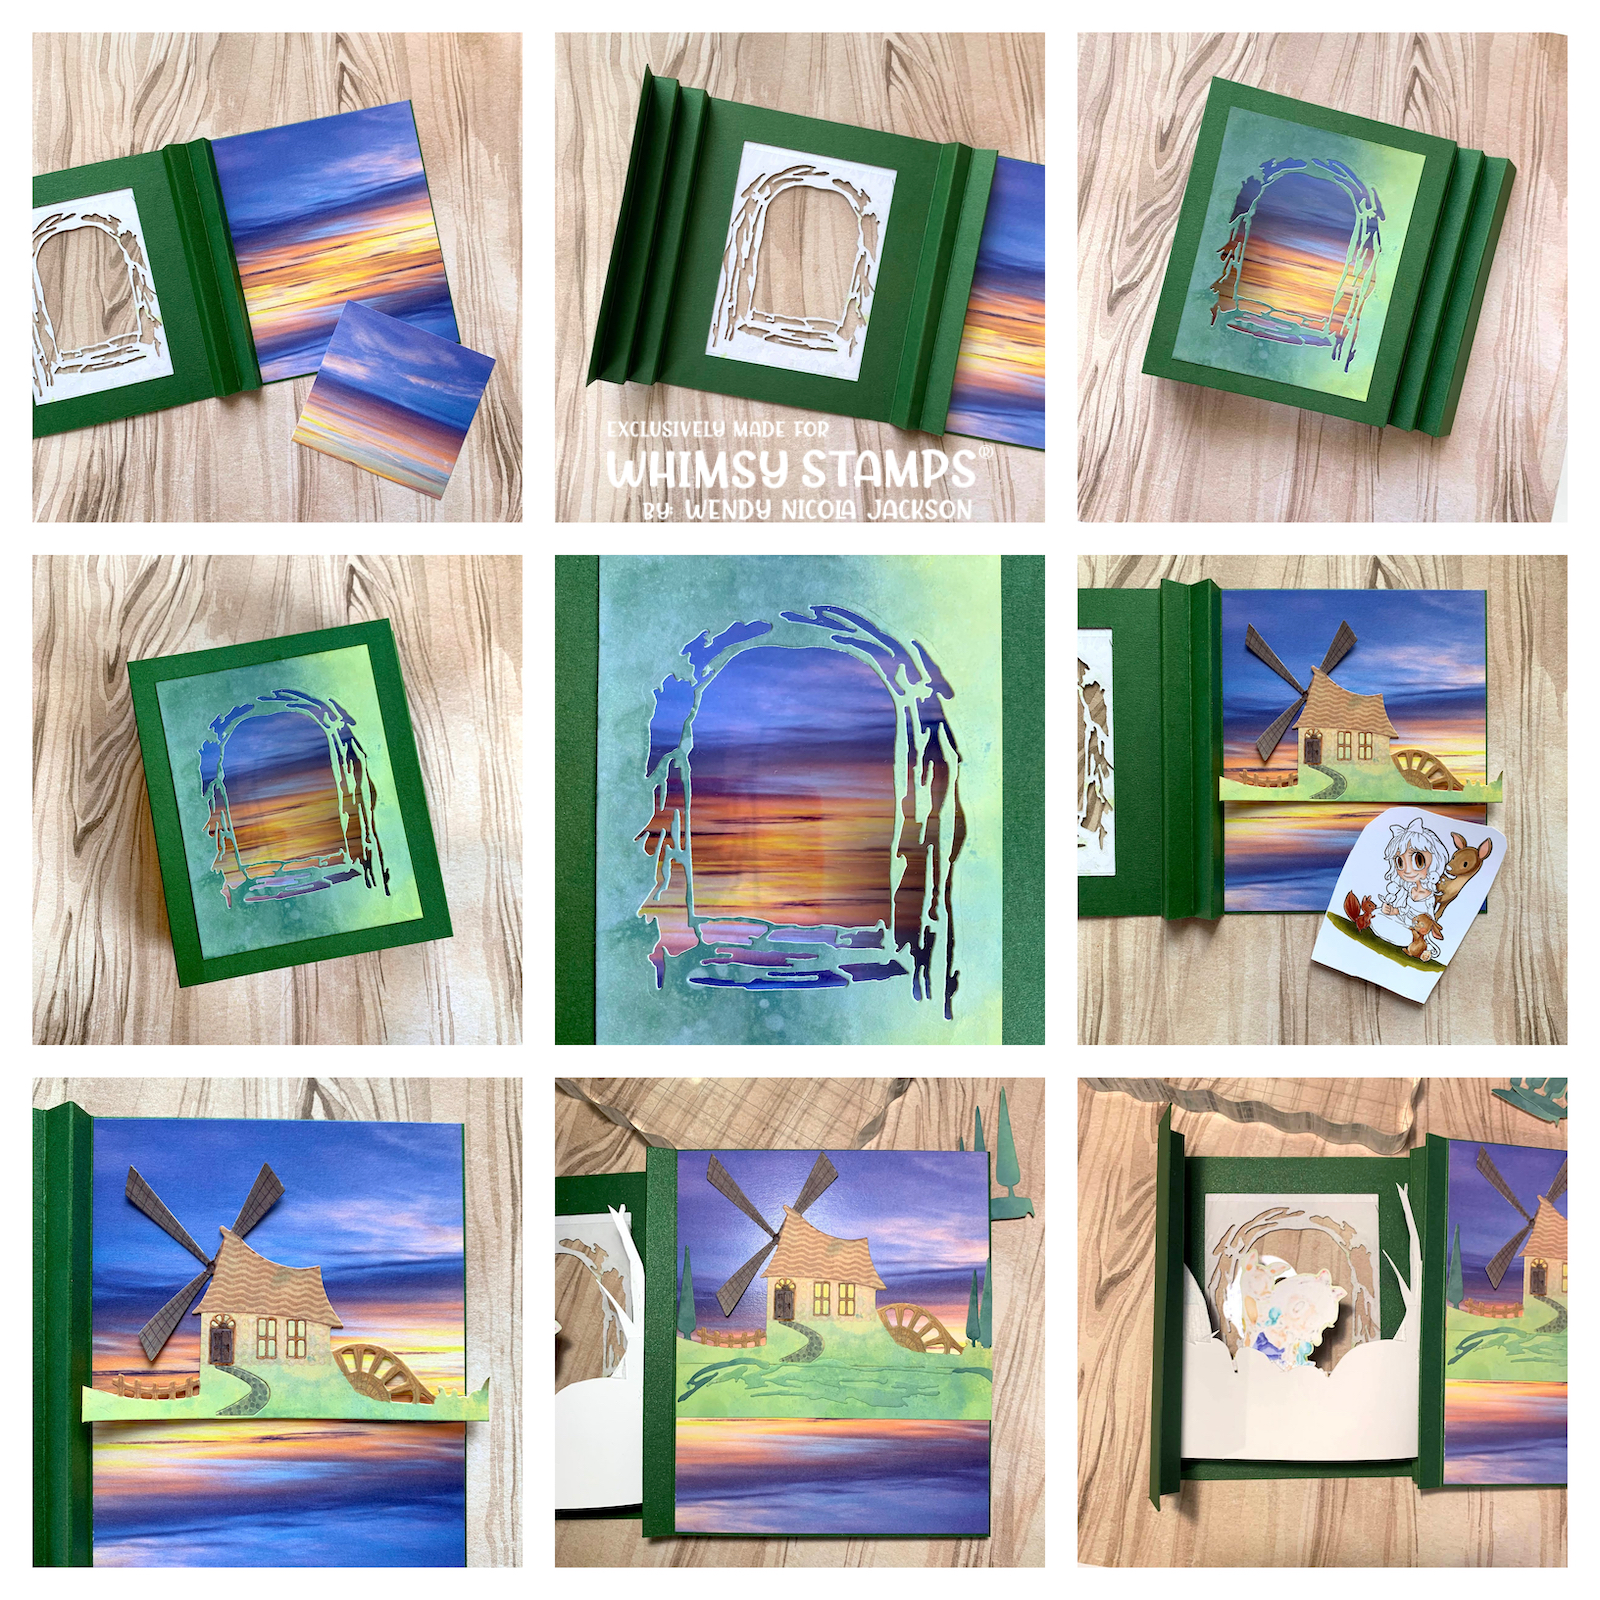
The images above show some of the process of creating this Shadow Box design. I didn't follow a template, just made it up as I went along, which means, it's not perfect! But I had fun working out how to make my idea come to life. I started with a cardstock panel that was wide enough to create the entire box card design including the concertinaed sides. I know there are other ways to create box cards, but I wanted this to fold flat for posting and to pop open when it came out of the envelope, so a concertina side works well for this. The front and back of the card measures 4 7/8" or just under 12.5cm wide and 5 3/4" or just over 14.5cm tall. The concertinaed sides were scored at 1/2 an inch 5 times, 3 as mountain folds, two in between as valley folds. This was done on both sides of the card and the excess trimmed off so I just had a nice tidy flap to glue along the back once the box design was completed. You'll note I needed to elongate the panel the windmill sat on, so it went all the way down behind the front image panel. I added a little strip of cardstock I had ink blended and then added on top a few of the negatives from the diecut window in front to give a 'rolling hills' texture and feel to that panel. I really love what that added to that panel.

This angle lets you see from the top, the folded sides and how the design fits together. You can just see the 'tab' on the right hand side across the back which I closed from the outside of the design, so there was nothing obstructing the decoration inside. I will add a piece of plain white cardstock over this with a message for my niece, so it won't be visible on the back in the end, I've yet to do that, as I'll write the message before attaching it.

This sweet image from Some Odd Girl is Snow White and really is a cutie with her sweet woodland creatures around her. I coloured her with Copic Markers, then fussy cut the image and where I'd left a white border, used a colour to edge the image that allowed it to sit back into its surroundings better. I went for an olivey green in the lower area to tone with the patterned paper I used to rest her on. I switched to a lighter brighter green further up to tone with the hilly background. I should have used colours to tone with the cottage around her head, that stands out a bit more, but this wasn't apparent until I had installed it into the concertina binding, but I'm pretty happy with how it looks. It's still better than a bright white border.

I cut some little corners to make this look like a fairytale book and finished them with tiny bronze coloured pearls. They were from Flourish With A Bling, which have sadly gone out of business now, but they had a lovely range of pearls in varied sizes all in one colour way and I've several of their pearl sets, which I bought over the years. It was the tiniest size I used for these.

I finished off the design with some of the cutest little toadstools from a couple of different Whimsy Stamps Die Sets. I'll link those below. Seriously though, for a girlie that has found little red and white toadstools utterly enchanting since I was small and first watched Bambi, I think they add a magical touch to this creation. My final magical touch was to add the wee squirrel from the 'Into The Woods' Stamp Set from Whimsy. This set has the cutest creatures and I couldn't resist using this sweet Squirrel here to complete the front panel of the design. One photo I forgot to take was of the image panel itself, once I'd put it all together. I added the fussy cut image to a cut down slimline paper from the Whimsy Enchanted Forest Slimline Paper Pack and added some of the taller trees which I fussy cut so as not to loose the tops, along the sides of that scene. Shame I forgot to photograph that bit before sealing the card shut! Harder to see the sides and extra details in a still shot.

Thanks for popping in today friends, I hope you enjoyed this crafty adventure, I sure had fun putting it together. I'll be back again soon with another crafty adventure. Until then, have a great week. Hugs xoxo


Comments
Pat xx
Lorraine x