Whimsy Stamps ~ Exquisite Beauty
Hey crafty friends, I'm popping in today with a card I made after doing a couple of classes with Tiffany Solorio. She's so talented and I adore the way she uses mixed media on her projects. I haven't a clue what I'm doing, but with a bit of tuition from Tiffany, I'm giving it a go and I must say, I'm not unhappy with how this card turned out!
I did have to go a little rogue as I wanted soft colours and don't own many distress sprays. So I kicked it old school and boiled up a teabag to use for some of my soft application of colour. I also used some Tea Dye Ink too for a bit of extra warmth. As I didn't have the spray, I just used an ink smooshing technique. I love how this came out as I was wanting a softer finish on this card.
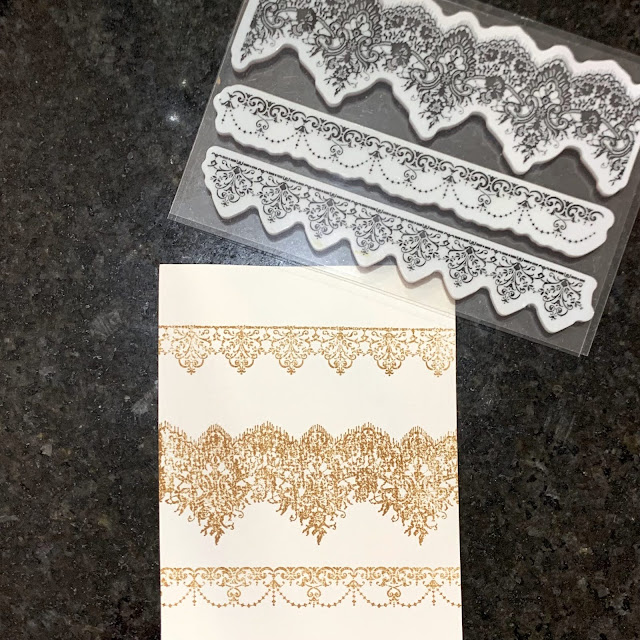
Before doing any of the ink smooshing however, I stamped the beautiful lace layers from the Whimsy Stamps Exquisite Lace Rubber Cling Stamp with Betterpress Ink in Tawny Brown which is archival and waterproof, so I could add water layers without the ink running. I used watercolour paper too, so it would handle the water layers.
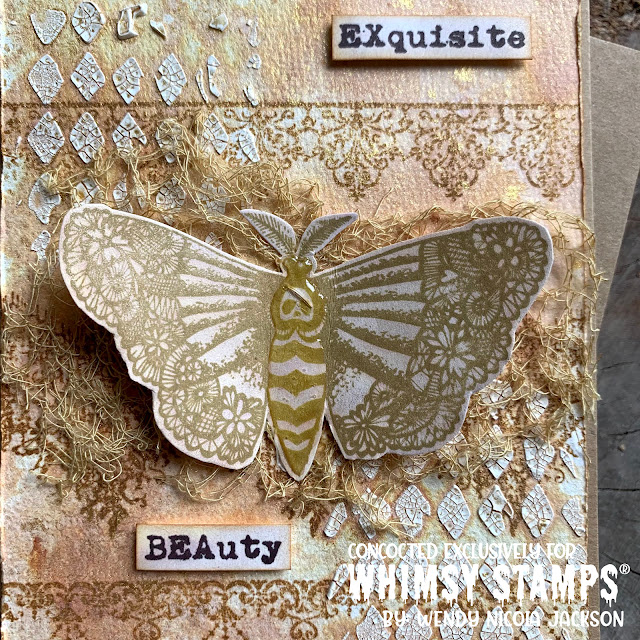
Next I stamped the fabulous doily winged Death Moth onto Hammermill Cardstock. I wanted to do some more ink smooshing, but quite lightly, for just a bit of colour on this one, so I hoped the Hammermill would stand up to the task and it did. I used the brewed tea bag again to add colour. Just smooshing the teabag randomly all over the panel to add a bit of colour and 'age' the paper. I did use the water that has Perfect Pearls in it to wet down the Distress Tea Dye which I added after the real tea bag, so the panel has a soft shimmer to it and it's pretty up close. I stamped the Death Moth in Archival ink so it would withstand the watery steps. I used Ranger Archival Ink in the colour Coffee for this part. I wanted to add another 'tone' into the piece, so I opted to use the Coffee Archival Ink rather than the Betterpress Tawny Brown ink I used for the lace.
I forgot to show that this step happened before the ink smooshing, which it did. I added the crackle paste through a fabulous stencil from Whimsy called the Harlequin 6x9 Stencil. I just love the options on this stencil. It has three variations of Harlequins. I opted for the slightly grungy version, which I think worked really well with the crackle paste. I did the ink smooshing after the paste dried so it would work its way into all those lovely crackled spaces accentuating them. Something that Tiffany taught in her class. After the ink smooshing dried, I then spritzed the panel with Fossilized Amber Distress Spritz, for just a bit of extra shine and Mica colour without any additional ink colour and I love the finish!
I fussy cut out the Death Moth decided where I wanted to place it on the piece, then took some of the onion bag that I had left over from my Pirate Creation. You may recall me talking about upcycling an onion bag for that make here and I had plenty left over, so I pulled it out again for this creation and oh my goodness, I love the texture and interest this little bit of upcycled cotton onion bag adds! I've stashed the rest away for another day. I glued the Death Moth over the onion bag and then once it was set, I added some Nuvo Crystal Glaze to the body of the Death Moth. Curious that there is a little crack over the 'face' of the moth, it makes him look like he has a pirate patch on! Made me laugh when I saw it once the glaze had dried! I didn't want to add any additional shading on the Moth, I love how it came out just with the tea bag smooshing and Distress Tea Dye ink smooshing.
I adhered the Moth only down its body, not on its wings, so they could be lifted higher as though he was just settling into place after a flight. I love the movement this gives the piece. I added the sentiment strips which were stamped over some offcuts of the ink smooshed cardstock the Death Moth was fussy cut from. I inked up the edges of the sentiment strips with just what was left on my Vintage Photo Ink Dauber, to darken the edges slightly, especially since I'd used a dark brown ink to stamp the sentiments. I opted for Pinecone VersaFine Ink, but wish I'd gone a shade lighter, I feel these are a little dark for the rest of the piece, but better than horrible, as Gina K would say! I added the sentiment strips with a little foam to elevate them off the card base.
Thanks for your patience with this long post friends. I write these posts as much to jog my own memory and journal my crafty adventures as I do to share my process with you, so thanks for sticking with me and if you read my full explanation, thank you and oh my goodness, well done! You've the patience of a Saint!
If you haven't yet grabbed your free exclusive copy of the poem I wrote that was turned into a stamp for this Halloween at Whimsy Stamps, you still have two days to get it! It is free with orders over $50, but once our Halloween term is finished, this stamp set is retired and will go into the vault. It was a limited run exclusively for this Halloween. You can buy it if you don't wish to spend $50, but only for the next couple of days. Once October closes, the stamp retires. Have fun in the countdown to Halloween. Hugs and happy crafting, Wends xoxo
(I share thumbnails to the elements I design with in order to make your search for them easier, in case you like something I've used. I do use affiliate links where possible, which gives me a tiny commission but costs you no extra whatsoever. It helps the companies I design for to improve their marketing practice and track my contributions. I am deeply grateful if you use them for these reasons. I am proud to design for the companies I do and always feel happy to share where my inspiration and where my crafty stash comes from. I am occasionally gifted products to use, but I only design for companies whose products I absolutely love and buy for myself. My opinions are always my own.)
Challenge Entries:
Papercraft Challenges: #111 ~ Spooky Season
Simon Says Stamp Monday Challenge: Stencil It
Wednesdays Creative Inspirations Challenge: October ~ Season of Autumn


Comments